On the Second WIP of Knitmas....
- vintagemegknits

- Jan 10, 2025
- 7 min read
Updated: Jan 11, 2025
My workroom gave to meeeeeeee..........!
Why has this little gem been hiding in the cupboard like it's in witness protection? I'm totally flabbergasted! Especially since it's as straightforward as a two-piece jigsaw puzzle!
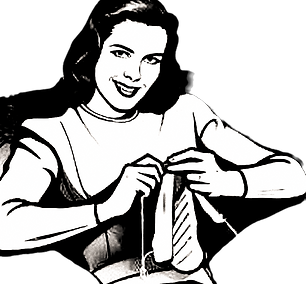
Behold, an Edwardian era simple lady's sleeveless wrap vest. I do like a vest for those "in-between" Autumn days or cool spring evenings and this one, with it's cross-over front, appears to have a bit of shape.

It's a smidge of vest, with a dash of simple 18th century sontag...
It's all about that garter stitch and single rib life. Sure, it needs covered buttons, but only four! I'm pretty sure I've got some vintage button blanks lying around. They're not exactly Edwardian old, but definitely older than me—and I'm creeping ever further south of the half-century, so not quite antique, but certainly vintage!
Perhaps I stuffed it in a bag because it's cream yarn (nice enough but not my favourite colour)... or maybe I just ran out of winter, tossed it aside for the summer, and completely forgot about it. But I think the most likely reason is that it's knitted all in one piece. It probably turned into a portable wrestling match, and ended up in the "I'll deal with this later" bag.
What I can tell you is that I stumbled upon this quirky, yet charming little number reprinted in a magazine from the disco-loving 1970s. I know right, who knew Edwardian fashion was a thing of interest for the 70s craft set. I made a photocopy and scribbled a ton of notes, which, thanks to my past self (you're the real MVP, past Meg), ended up in the project bag.
I haven't managed to hunt down the original late Edwardian era pattern to share with you. I have through reverse image searches, found several patterns from circa 1910 to 1915 that appear to feature the same lovely lady as a model. What I can offer you is my version, which I had to expand from the original reprint to accommodate the generous acreage in the front paddock. I've also deciphered some of the old-timey lingo and added some missing details because, like soooo many vintage patterns, they were about as detailed as a treasure map drawn by a pirate with two eye patches.
A New and Simple Vest for the Sporty Edwardian Young Lady
Size: The original pattern is for 36 inch bust (with my upsize to 40-42 inch noted in brackets through the pattern)
Notes: Most vintage patterns measure the high bust (under the arms) and not the chest around the fullest part of bust. I've left most of the measurements in inches as this is how I usually work anyway. Most tape measures list both inches and centimetres but just in case yours doesn't:
1 inch = 2.54cm
Or there are tons of online converters if you don't have a calculator nearby. Sure, you could go all retro with pen and paper, but let's be honest, I'm lazy, math is my nemesis, and I'd probably end up with an answer only a mother could love.
Materials: original materials listed as "2 balls good Shepard Shetland Floss in "wild rose" or 3 balls good Shepard Rainbow Yarn in pink and 1 ball in white, one pair ivory needles no.5 and 4 one-inch button moulds".
You will also need a stitch holder. spare needle or waste yarn, your scissors and a bodkin (large eyed blunt sewing needle).
Notes: This snazzy piece of knitwear is crafted in one epic go, starting at the lower back and splitting up for the front—like a knitting magic trick! So, grab those longer needles or a circular one if you want to keep it comfy and avoid turning your arms into spaghetti.
You can still get button blanks (the base for self-covered buttons). I have a few vintage ones floating about, or just use some regular large buttons to suit your yarn.
As for the yarn, it's playing hide and seek, and I'm losing! The vintage "white" isn't the dazzling snow-white of today; it's more like the color of grandma's favorite doily—off-white, ecru, or pale cream. I dove into my yarn stash to find something that would work, based on the needle size and tension info below. Let's hope it's not a yarn-tastrophe!
Tension (or gauge, if that's how you roll): 5 stitches and 5 "ridges" to the inch.
Notes: So, a "ridge" is basically a little bump party created by 2 rows of garter stitch. You’ll be rocking 5 stitches and 10 rows of garter stitch per inch (2.54cm) or 19.5 stitches and 19 ridges (39 rows of garter stitch) per 10cm/3.9 inch square. I hit the jackpot tension with 8ply/DK weight yarn and 4mm needles (old UK no.8/modern US no. 5). The number 5 made me think it was meant for DK/8ply/Worsted weight yarn (though many US patterns before World War 1 were all about the UK lingo). The model struts her stuff in several US knitting publications so I'm assuming it was originally a US pattern with US needle sizes, but if the needle size is also in UK-speak, that would be a 5 or 5.5mm needle/US no. 8, where I might have hit tension with a chunky 4ply/fingering or 5ply/sport weight yarn... hmmmm, I’ll let you pick your poison, I mean yarn.
You might also like to grab a pair of 3.25mm needles (old UK no.10) for making your buttons. This is optional but I found that a tighter fabric is better for this bit.
My chosen yarn:
In a moment of sheer crafting chaos, I grabbed whatever yarn was lurking in my stash large enough to cover an adult torso. Enter: Viscount Courtelle 8ply. According to the ball band, this DK weight yarn is 100% Courtelle (acrylic) and hails from the exotic lands of New Zealand. The shade is called Aran, not quite white but not quite cream. I scored this treasure for a song at the local op shop (the little sticker says I got 7 full balls for $12AU). I think it was originally destined for a crochet blanket that never saw the light of day. Each 50g ball boasts around 150m/165 yards of yarny goodness. This yarn is discontinued, and my detective skills haven't unearthed much about it. But hey, it's light to work with—a real treat when you're knitting a one-piece wonder for someone with adult-sized ambitions.

Starting at Lower Back
Cast on 70 (80) stitches (I just did a standard two needle style cast on).
Knit in single rib (Knit 1, Purl 1) for 2.5 inches.
Next row: Slip 1 knitwise, knit plain (knit/garter stitch) to last stitch, purl 1.
Knit in this manner until you have 65 (78) ridges (130(140) rows) or until work measures 15.5 (16.5 inches from cast on.
Divide for Fronts
Knit 23(27) stitches garter stitch and leave these on a spare needle (stitch holder).
Cast off 24 (26 stitches.
Knit to end.
Shape Fronts
Side 1
Continue in knit (garter) stitch pattern increasing every second row at neck edge until 70 (80) ridges have been created ( 140 (160) rows).
Knit in single rib (knit1, Purl 1) for 2.5 inches making two button holes, approximately 3/4 of an inch apart at the front (neck) edge.
Heads up: I popped the first one in row 5 and the second about an inch lower. Feel free to use any wizardry you prefer to conjure up those buttonholes (because in classic vintage fashion, the original instructions just said "make buttonholes" and assumed you were a buttonhole-making prodigy).
To make button holes
Row 1: Work 3 stitches in single rib.
Cast off 2 stitches and continue in single rib to the end of the row.
Row 2: Work in rib to last 5 stitches.
Cast on 2 stitches and continue in single rib to end.
Cast off.
Side 2
Pick up the stitches from the stitch holder and work as for Side 1 remembering that the shaping, including buttonholes, all happens at the neck (inside) edge.
To Make Up
This is where the party starts! With a regular vest, you'd just stitch up the sides and toss on a neckband. But not for this sporty Edwardian Lady—she might just be a garter stitch baby but she's got some flair!
Sew up the left side seam from the cast off edge for 9.5 (10) inches leaving a 6 (6.5) inch opening for the armhole.
Sew the right side seam from the cast off edge for 1 inch, leave a 3 inch gap (this forms the opening to pass the opposite side through to button up) then sew the remainder of side to armhole.
Follow the instructions on the packaging to cover your buttons if using button blanks if you are using them. If you are using regular buttons you can skip this step.
To cover mine I knitted 4 small squares by casting on 8 stitches and knitting until I had a square of fabric (I ended up going down to a 3.25mm needles for this bit so the fabric was a bit tighter and didn't leave gaps when stretched over the button base).

Before you start sewing buttons onto your vest, give it a test drive to make sure it fits like a glove. You'll notice that the front panels are wider at the bottom than the back, which is intentional so they can wrap to hug your waist. Mark these spots before you start sewing. You can use pins, but I used a bodkin with some waist yarn to make a loose stitch. Honestly, a second pair of hands would have been handy when I did this (Dad joke intended) but hey, we live and learn!


The original pattern cheerfully suggests you grab stitches around the armholes and the front opening, only to toss them off again. In classic vintage style, it keeps you guessing with zero clues on how many stitches you need. Luckily, I'd already slipped the first stitch and purled the last one on each row, creating a tidy edge, so I skipped this step. If my decision comes back to haunt me and the whole thing begins to sag like an old couch, I'll update this post to spill the beans on how many stitches I finally wrangled.
Until then,
Happy Knitting.
Megs.


Comments